|
FAQs on Glass Aquarium Repair, Chips/Cracks 9
Related Articles:
Aquarium Repair,
Acrylic Aquarium Repair,
Cleaning Aquariums,
Marine Tanks, Stands and Covers,
Used Gear for Marine Systems,
Designer Marine tanks, stands and covers,
Related FAQs:
Chips/Cracks 1,
Chips/Cracks 2,
Chips/Cracks 3,
Chips/Cracks 4,
Chips/Cracks 5,
Chips/Cracks 6,
Chips/Cracks 7,
Chips/Cracks 8,
Chips/Cracks 10,
Chips/Cracks 11, &
Glass Aquarium Repair 1,
Glass Aquarium Repair 2, G lass Aquarium
Repair 3, Glass Aquarium Repair 4, Glass Aquarium Repair 5,
& FAQs on Repairing Glass Tank: Scratches/Blemishes, Cross-Braces, Leaks, Whole
Panes, Tools: Cutting Glass,
Silicone, Moulding/Frames; Techniques; Olde Tank (Slate Bottom, Metal Frame,
Pecora...) Repairs, Troubleshooting/Repairs, &
Acrylic Aquarium
Repair, Used Aquarium
Gear,
|
.jpeg) |
|
Chips in 240gal Tank 8/13/13
Hi guys,
<Slip/David>
I've been poring over your site for the last couple of days and haven't
managed to find a problem that really fits 'exactly' with the problems I
have. I may just need to do some more digging.
<Mmm, if you scanned through all the chipped glass tank repair FAQs
you're done>
I acquired (about a year ago), a 240 gallon, custom aquarium,
approximately 24"w x 32"T x 72"L, made form 5/8" glass. It has a
built in overflow that uses 8" of one end of the tank and has
euro-bracing around the perimeter of the tank. It does not have a
cross-brace.
<I would add one (a foot or more wide) in the "middle"; on top or bottom
of the (doubled) Eurobraces already present (and chipped/broken)>
This tank, as you can imagine is a beast to move and was treated rather
roughly by it's previous owner during moving due to lack of planning and
too few hands (cost one of them a finger).
<Ohhh!>
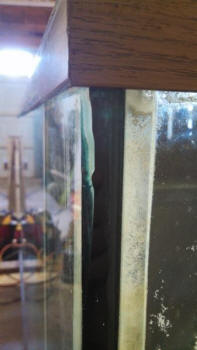
The trim on both ends of the bottom were torn off. On one end, the
glass escaped unharmed, but the other wasn't so lucky. In the
picture attached, "bottom_corner_chip", you can see the rather large
chip on the bottom pane.
<Yes; but/and this doesn't look/appear "too bad">
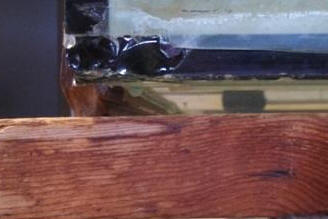
There's also a sliver chipped off the opposite end, at the top, just
below the trim.
<I see this as well>
In addition to those, the bracing has broken and cracked in the center
on both long edges. I think those were more due to the stress of
holding the water and had less to do with moving.
<Mmmm; I hope/trust due to something other than holding water>
Alas, I really want to set this tank up. The silicone looks a
little rough in a few places and discolored (orange/brown color) in
others and I would really like to 'not' have to reseal this monster if I
don't have to. It would be my first time and I'm not terribly
confident I wouldn't make it worse.
<I would try it as is; then as the next level of repair, cut out and
replace the corner seals... LASTLY I might attempt cutting out the between glass, cleaning
up (w/ Toluene likely) and completely re-assembling... But more likely
would turn into something other than an aquarium...>
The tank was originally used as a saltwater tank, and has not yet been
cleaned. I intend to use it for African Cichlids and upgrade their
living space.
<Ok>
I intend to set this up in my garage prior to moving it inside the house
to its final destination, but I would rather get it repaired before
putting water in it to even bother trying to test it.
<Good. I would go this route as well>
Moving, as stated before is an issue and requires minimum 4 people and
lots of luck, so the fewer times it gets moved, the better. It's
currently sitting on 2 furniture dollies, with 2x4's under each end so I
can move it around while cleaning it, but flipping and lifting requires
planning.
<Yes>
So my question is, can this be repaired to a point where it wouldn't
explode? If it can, what's the best method of doing so?
<I would try simply "filling in" the external gaps/chips with Silastic
(to prevent hand cuts), and do the repairs/additions mentioned above...
Easy (even fun!) to add the bracing atop or below the extant... and the
front/back brace piece on top or below the long run braces>
Thank you in advance,
David
<Glad to assist you. Bob Fenner>
|
.jpg)
.jpg)
 |
Re: Chips in 240gal Tank
8/13/13
Thank you very much for your quick response. I'll make the suggested
repairs and let you know how it goes.
<Thank you, BobF>
Thanks again,
David Re: Chips in 240gal Tank; plus bracing
and resiliconing 9/4/13
Hi Bob,
Thanks again for your previous help, but I have some more questions and I
wanted to compare ideas a little. I talked to someone that works
at/for glasscages.com. He suggested that I go with 2 center braces,
vs. 1, even if they're smaller.
He said, "Two braces are always better than one."
<I do agree with this statement; just the more there are, the harder it is
to get "stuff" in/out of the system, catch livestock... at some point,
having more braces/bracing is of not much more benefit>
I just wanted your opinion on doing (2) 4" wide or 6" wide vs. (1) 12"
wide as previously suggested.
<... also; "the wider the braces the better"... w/ same comment re
"diminishing returns">
My plan is to put a cross brace or braces between the existing bracing,
and then laminate a second cross brace on top of it with the rest of the
laminated bracing.
<Good>
He also pointed out that they build theirs with euro bracing at the top and
bottom of their tanks. I like the "idea" of doing the euro bracing at
the bottom as well, however, I'm leery about doing any cutting on the
existing silicone.
<Mmm, this isn't really a big deal... a bit of work (look into tools for
holding on to single edged razors), but can be done leisurely; not all at
once>
From what I've read on your FAQ's, I would have to cut the silicone out of
the corners, being careful not to cut in between the glass panes.
<Yes; and again, not hard to do>
If I do that though, will I not have to replace 'all' of the silicone in the
rest of the seams as well?
<You will not have to replace the rest; no>
My concern would be tying into the silicone on the vertical seams if I
only cut out the bottom silicone where the bracing would go.
<The "in corner" Silicone is not functional in terms of holding the tank
together (not much anyway), but really to protect the "between glass"
Silicone...>
Another concern would be physically crawling into the aquarium to work on
the bottom of it. I know the water puts a lot more pressure on the
glass that I could, but it's spread out over the whole pane. Would me
(155 pounds) crawling around in the aquarium hurt it, so long as it was
resting on a blanket to keep from scratching it etc.?
<Yes; assuredly... Though I'd likely have friends help tilt the tank on the
face, back and just enter it this way; rather than crawl inside>
It's 30" deep, and to work on the bottom, I would have to crawl in.
Thanks again,
David
<Welcome. BobF>
|
|
Chipped Corner - Used Tank Integrity Question
7/15/13
Hello!
<Shaun>
I just picked up a used 100 gallon bottom drilled tank off craigslist
for 60 dollars (approximately 48.5 x 18 x 28). It appears to be an older
Oceanic tank because of the glass euro brace in the middle of the top.
It was missing its bottom frame, but was not worried as it came with a
custom built stand in which 6x6 posts support the tank corners and
stand frame, along with cross members supporting approximately 80 % or
more of the tank bottom.
<Reads as substantial>
The tank bottom glass sits level and flush on the corner posts and
middle support members. The stand was designed with the tank recessed
down approximately 1.5 inches to keep it from sliding off the stand.
<Won't be sliding anywhere... unless there's a large earthquake in your
area>
Some scratches, but overall a good deal for upgrading from a 55 gal to
100 gals on a budget!
Wasn't too worried about the missing frame for only 60 bucks. After
getting home, I noticed on the end I did not carry while moving the tank
there was some tape on a corner. Upon closer inspection i noticed a
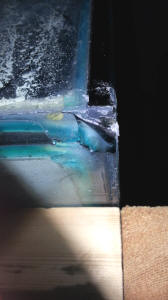
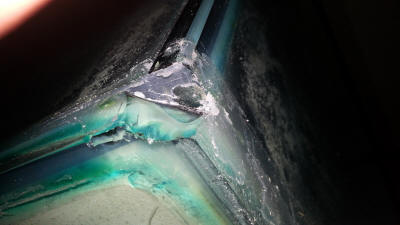
sizable chunk of glass missing from the bottom pane corner. For
reference, the side glass is approximately 1/2 inch thick and the bottom
glass is approximately 3/4 or slightly thicker. This damage occurred at
the front left corner (in both pictures you are looking from the bottom
upwards...the left side glass is the tank side and the right side glass
is the front glass).
<Got you>
Is this a catastrophic injury in which it makes it unsafe to use this as
an aquarium?
<Mmm, likely not... I WOULD fill in the chipped out area with
Silicone/Silastic, to prevent cutting hands>
Or is there some kind of repair I can do to strengthen the corner. I am
concerned only because the chipped of glass has exposed a part of seam
from the side and front glass, however, there is no obvious signs of
fracturing, bubbling, or other disturbance in the side seam.
Furthermore, there is still the near original thickness of silicone
adhering to the bottom of both side and front panes of glass.
What do you think as to the integrity of the tank while utilizing the
custom stand?
<I'd try out (the garage, or someplace flat outside), and fill the tank,
leave it filled a few days>
Can I still use this tank, or am I better off unloading this tank to
someone for use as a snake, lizard, etc enclosure?
<Try it out>
As much as I like this tank and was intending to do an in-wall display
with it, I can't help but wonder whether I should keep looking for a
better used tank and not waste the time and effort on this one. In
addition to cleaning the tank up prior to use, I had intended on
re-silicone beading the entire inside.
<Oh! If you do so; lay in some 1/4" (triple strength) plate stripping
(2" wide will be fine)... see WWM Glass Tank Repairs FAQs re, in the
bottom seams... all the way around>>
The guy I bought it from got it used and never set it up, so I figured a
re-seal was not completely uncalled just to "be sure".
<A good idea; with the added strips>
All thoughts and guidance from your experiences and expertise are
greatly appreciated.
Respectfully,
Shaun D.
<And do detail, photograph your progress. I'd write all up for an
article for the petfish 'zines. Bob Fenner>
|
Re: Chipped Corner - Used Tank Integrity Question
Hello again! First of all thank you for your first reply and help!
<Welcome>
I was trying to find a faq on the website as suggested over the last few
days about adding the 1/4" plate stripping. I was able to locate one faq
that referred to placing the glass strips on the outside seam.
<Mmm, no; not on the outside, but the inside seam... silicone into the
corner; the added glass stripping laying flat>
Was this what you were referring to? Or should I actually place the strips
on the inside of the tank?
<Ah yes>
If on the inside, should the strips be affixed with the 2 inch width along
the bottom or sides?
<On the bottom>
Thanks again!
Shaun
<Sorry for the confusion. Bob Fenner>
|
|
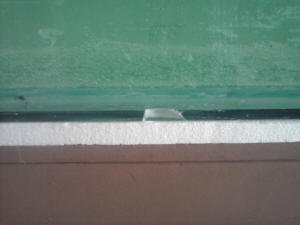
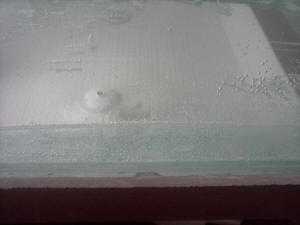
emergency! Chipped glass tank... mystery
Uneven stand f' as well
7/11/13
Dear Sir/Madame,
<Amad>
I have a 220x80x70cm tank, it's made out of 10mm glass. So the
tank is 70cm
high and I gave it a test fill after giving the silicone about
two weeks to cure. I filled it up to 65cm, but I'm planning to fill it
60cm max. So I filled it and left it like that for a day (the tank with
about 1100L of water), the next day I didn't notice any problems,
when I came back later that day, I noticed that chips had broken
loose from the bottom pane from both sides, front and back, see pics.
<Broken loose? Something... someone must have impacted this area with a
solid>
I emptied it, leaving just a cm of water and removed the pieces, thank God
it was not leaking, one piece was quite big but most of the silicone was
intact (I had to remove a small bit of silicone to remove the chip), and
it didn't crack the bottom pane
further. The backside chip is smaller, but both chips are about at the
same spot on each side. I noticed that even when I filled the tank with
1100L water, that the bottom pane still doesn't touch the
Styrofoam, but is a little little bit above it.
<Something amiss here... I'd take the tank off and measure your stand
surface in several places with a long level or a short one with a long
straight edge. The surface of the stand itself is apparently not level,
planar>
I don't know if the chipping was caused due to weak spots at both
sides or because of the stress...
<Not likely at all... otherwise the tank bottom glass would have split.
This is an impact break>
It didn't leak. So what I did next was silicone the pieces back into
place and I siliconed an aluminum corner strip to the front as
you can see in the picture. I have still to do that for the back. The
aluminum goes about 2 to 3cm underneath the tank. On
the inside there is a glass plate on both sides used for bracing.
<A Euro-brace... near the top... on the long faces of the tank.>
So my questions are:
(1) can I use this tank if I fill it up to 58cm to 60cm or will the tank
burst?
<Too likely the latter>
(2) was the fortification with the aluminum a good thing to do?
<Not a good thing... It only "goes about 2 to 3cm underneath the tank."
Why would you make an edge that disallows the bottom glass to sit flat?>
(3) what do you think caused the chipping
<Impact>
and why isn't my tank 100% level on the Styrofoam. I screwed a piece of
plywood on top of the stand so that it would be level and not bent, and
on top of that I've put the Styrofoam.
<Did you check to assure the ply was planar AND level in all length,
width dimensions?>
What are my options and what should I do.
<Mmm; more of a repair here is required>
picture 84 and 85 are of the front, picture 86 and 87 of the back and
picture 88 of the aluminum corner strip I added to the front after
siliconing the chip back into place.
thank you very much.
Amad
<I'd drain the tank, test the plywood top as stated, and cut off the
aluminum parts that go under the tank bottom... AND cut out the internal
bottom Silicone/Silastic, and place a strip (5 cm., 2 in. wide is fine)
of 10 cm. glass, Siliconed in all along (flat) the bottom seams). See
WWM re such repairs. Bob Fenner>
|


 |
Re: emergency!
7/11/13
Thank you for the answers Bob, very much appreciated!
<Welcome>
But what impact, there is nobody here who could have done it, at least no
human begin, and I don't have any animals inside the house... and it's at
both sides, so my guess is stress
<Very strange>
And shouldn't the Styrofoam make everything that is not level, level?
<Mmm, no; helps if all is just a bit... a few mm.; not level>
I have a Eurobracing at the top and the bottom, you can see that in
the pictures I've attached to this e-mail.
<Ah, good>
Other than that the plywood was slightly bent, it's 100% level,
maybe I have to screw it in more places, but I thought I had done that well
enough.
<I'd screw it every six inches, 15 cm., AND seal/coat the plywood...
it will warp in time otherwise if/when it gets wet>
What if I removed the plywood and placed the tank on top of the stand after
placing the Styrofoam on top of it, see pic of the stand attached.
<I see>
Ok, so what I'll do is:
1) get the heavy tank with some help of the stand and check the surface of
the plywood.
2) should I cut out the silicone of the whole bottom? I have a Eurobracing
at the bottom at both ends, at the top and the bottom as you can see,
wouldn't that be good enough? Maybe I've misunderstood what you mean.
<After seeing these pix, I would NOT cut the Silastic... I would leave all
as you have done for the tank as it is>
Thank you!!
Amad
<Welcome. BobF> |


 |
Re: emergency!
7/11/13
It could be that the pane was damaged a little at those spots and that it
couldn't withstand the pressure so it chipped off,
<... doesn't happen... glass/es are super-cooled liquids... don't fracture
as you describe>
maybe that's a logical explanation? The large panes have been cut by hand,
he (the one I bought the glass from) said that they didn't fit in his
machine.
<No worries; huge pieces of glass are cut by hand. Easy to do w/ proper
tools>
I hope to be receiving an answer from you, thank you for your help so far.
Kind Regards, Amad
<And you, B>
Re: emergency! 7/11/13
I know that the plywood itself is 100% in it's dimensions, because it's a
factory plywood as you can see in the pic I have attached.
gr. Amad
<... and you're sure no one has been in the house; could have damaged the
tank by bumping something hard into the edge? I'd be asking all who have
access to the area. B>
Re: emergency! 7/11/13
Thank you!
<Welcome>
Yes I asked my mom if no one entered at some point, she said no, and at this
time I am around the house most of the time, I haven't seen any kids.
And it's at both ends, a child would just throw something at it, not plan
strategically how to destroy the tank.
<... Again, very odd>
So I should not cut any silicone?
<Correct. I would fill in, as you say you've done, the "scalloped out areas"
where the glass was chipped (to prevent someone cutting their hands), but
the internal bottom bracing should hold this tank together>
Just try to make the plywood 100% (I honestly thought it was and as you
said, those 2 or 3 mm's are being sorted out by the Styrofoam).
<Yes; should be... BUT, you stated you could see light between the foam and
the tank bottom... not good. This IS more than a few mm.>
So that's then the only thing I'll do, look at the stand and level it. Do
I need to do anything other than that and it will be
safe to fill it?
<Should be; yes>
I will also remove the aluminum from the bottom. Let me know if I forgot
something.
<With the Al removal you should be fine>
Thank you for your help and expertise!
gr. Amad
<Glad to share. B>
Re: emergency!
7/12/13
Thank you!!
gr. Amad
<Welcome. B>
|
Re: emergency! Chipped glass tank, uneven stand
7/16/13
Hi Bob,
I would just like to say that I put screws every 10cm and it didn't
work, maybe the stand underneath the plywood isn't 100%, it's very
frustrating. And it really is just 2 or max 3mm above the foam in the
middle and the right side. When I filled it with water, the right side
went down but not in the middle, this probably caused the chipping, and
perhaps the bracing was the reason that it didn't break the bottom pane
in half. I don't know what to do. I hope you have some advice for me.
<Mmm, if it were me... I'd redirect my frustration/angst w/ this
project... remove all the screws, determine where the dang high spot/s
are, grind them down and put the ply back on>
Thank you.
Gr. Amad
<Welcome. BobF>
Re: emergency!
thanks. Then I have to call in many people to help hahah, I calculated
that the aquarium is about 200+ kg.
Gr. Amad
<Yeeikes! Yes; many friends... and a good plan... likely suction type
tools for lifting the tank. BobF>
Re: emergency!
o man! I don't have those possibilities out here, so what should I do
than, because I'm afraid it'll break!
gr. Amad
<Better that it breaks w/ you and friends shifting the tank off the
stand, then when it's filled. B>
Re: emergency!
true.. but I think the tank won't survive, it's really heavy, I'll have
to place it on foam on the ground, lifting it up might be even worse
then
<... so?>
Re: emergency!
maybe I'll just shift the tank, unscrew it bit by bit, than turn the
plywood with the tank on top, if that'll work and try to sand the higher
places of the stand
<I'd remove>
Re: emergency!
Hi bob,
<Amad>
maybe you can look at these pics, what do you make of it?
The first pic 89 shows the tank filled partially, I filled it just now.
Pic 90 a pic of the left side, its on the foam.
Pic 91 is of the middle
Pic 92 is of the right side
Pic 93 is a close up of the right side
Pic 94 is a close up of the middle
Pic 95 is a close up of the left side.
I hope the pics are good enough
Do I still need to sand, I'd rather not because it will be a tough job
with the risk of breaking the tank.
<.... is the tank not settling flat on the foam? B>
Thank you.
Gr. Amad
|


94 & 95' Not all right, I see the light... |
Re: emergency!
it is as if it's not, when there is no water in it the left side is on it,
the middle not and the right side not, but the space is not big between the
aquarium and the foam. When I put water in the tank, the right side goes
down but not the middle. Maybe the stand is a little bit higher on the left
side. I am emptying the tank.
<Amad; I am VERY glad/relieved to read this. B>
Re: emergency!
the stand is pretty even, I shifted the tank and placed a level at the front
from the left to the right, then at the back from the left to the right.
<Keep moving the level... and if it isn't long enough to span the uprights
(and ply), use a true (flat) straight edge under (between) the level>
At some places maybe a tiny tiny bit off, but I don't think that's the
reason, or at least I don't know what the reason for the tank not being even
on the Styrofoam can be
<? Well; either the ply, the foam or the stand is uneven... or the floor
with the stand setting itself uneven on it... My vote is still on the stand
being the issue here. B>
Re: emergency! 7/16/13
that I am emptying it? I still don't really know what causes this, maybe it
could even be the foam
<.... READ here:
http://www.wetwebmedia.com/aqstdleveling.htm
and the linked files above> Re: emergency!
7/16/13
It's about half a cm difference between the water level
at the far right and the far left.
<!?>
But that couldn't be the cause right?
<....>
Re: emergency! 7/16/13
>Stop writing: READ>
hahahahah but what's a 1/2 cm? Could this really be the cause? I measured
the far left and the far right after filling it and it was about 1/2cm more
water on the left, so that would mean that the right side is 1/2cm higher
from the bottom. So this would solve the problem? putting something of a
1/2cm underneath the stand at the right?
Re: emergency! 7/16/13
alright I will thanks m8!!
Re: emergency! 7/16/13
you guys need a medal you know that hahah.
gr. Amad
|
|
Crack in sump Please help
5/19/13
Hi there, I woke today and noticed my external dolphin pump was making a
weird noise. I disconnected the pump, and cleaned it. When I went
to go connect it again my sump cracked!
<Oh! No fun... and quite common when there's much force on through puts
here>
it got 16" crack all the way down the side of it. I pulled out
the water out of my sump below the crack. I bought some GE silicone 1 to
fix it. Well this work, or am I screwed?
<Mmm, I'd very likely replace the tank itself... too likely that the
repair will prove unsuccessful, unsightly. You could save the
cracked/repaired one for a back up... but I'd affix a new piece/panel
over the entire visible side... redrill>
I have a 180 salt tank and sump is 70gallon. I also read
the instruction on the back and says I got 12 hours before I can fill it
back up.
<Give this 24 hours>
My fish won't make it that long.
<Mmm, they should... put all pumps, aerators in the main/display tank>
I pulled all the water out and put it in my r.o. bucket. I did leave the
live rock in there. Please help, Becky
<Perhaps an acrylic sump replacement. Bob Fenner>
Re: Crack in sump Please help, now bad Dolphin pump.
5/20/13
Thank you Bob, I went to bed my pump was quiet I got up and it was way
loud. I cleaned it out and its still loud. Its a dolphin Ampmaster pump.
Not even six months old I paid $400 for it.
<Send it back... it will be replaced>
�� Its a good lessen to not work on your tank at 4 in the morning. Becky
<Yikes! BobF>
|
Wales glass bending. Hole and bowing concern
2/28/13
Hello from Wales.
I have a tank with the fish and the coral trees all growing together. It
is a rooms divider and is 62 inches tall and ate feet (96 inches) in
length with the wide being just 30 inches so I can get in and clean
occasionally, (not me, the tank I mean). I also have real rocks inside
the tank with bushes on too some of them....My batfish likes these.
I had this tank made with the very thick glass I think it was diamond
white glass and was 10 mm thick all over. (I don't know what mm is but
it looks nearly one half of an inch plus a bit). The glass was
very straight when the men input the tank and was very straight all
along the front and back.
Now I have the tank going for 8 months (I have a dump below the tank in
my seller <cellar> with extra sea water) which feeds the water up and
down.
As I was saying the glass was very even along the front and the back but
now it seems like it is a bow front tank, is this normal?
<Mmm; well, glass/es are super-cooled liquids, not really solids... and
do "flow" with time; but not this short a period... likely was bowing
all along once filled>
Also there is a very tiny hole right at the bottom,
<!?>
not at the front but at the back! I attack <attached> a picture with
this mail ok?
<Yes, I see it... a puncture-caused piece is missing>
It is a funny hole because you can actually/seriously pass a thin
wire/needle right threw it and it has big round circle round this point.
<Like a bee bee or small caliber shot...>
After much pushing and some blood getting the rubber in the hole
<Silastic I take it>
with glue as well the piss/leak seems to stopped.
<How far below water level is this hole?>
I did have to drain out the tank which the fishes didn't like one little
bit, flapping and jumping all over the place they were!! But now
is ok, they have water back.
My house is in the sea (well not in it as such but very close) so I
don't have big bills with the salt/powder to buy. I have a titchy/tiny
bat fish but he is now like 2 feet tall and he eats lots of coral trees
and bushes.
(Hehe one day my porcupine shark will eat him no?).
<Not likely; Platacids are smart, and faster>
So my friend Bob and sparky or was it scottie I used to speaks to many
years ago? How can I make the front of the tank flat again please?.
<Can't be done>
I think I needs help yes?
Many many thanks,
Ayrton.
<As many welcomes. Bob Fenner>
|
 Re: Wales glass bending. Hole, leaking... too-thin glass
3/3/13
Hello,
<Si>
Thank you Sir Bob (the man himself answer my question I am proud)
Have emptied and filled this tank 3 times now....am fed up.....Still it
leak.
<Dang!>
I am ok now, have taken the water out from the tank, fish and trees in
temporary getup, they will be fine for a time yes? My bat is so tame
now, he lay on my hand when I take him out of the big tank and not flap
any! He still eat well too. Lion fish not too happy. I have to be
careful when am in tank with him as he can sting very bad, but you may
know this already.
<Ah yes>
I could not stop the leak. It was right near the very bottom say 2
inches up, or 58 inches about from the top!
<Dangerous... 10 mm glass is too thin for this height already>
I tried with the rubber in the tube but I got in real mess (more on me
than on tank....Not good). A friend of mine say to give up on the
wall tank or make glass 4 times thicker, but that my friend Bob, is way
way too much money.
<I'd consider making this a "partly filled" system... perhaps
brackish biotope, a mangrove swamp, a paludarium...>
The hole in my tank? Was not bee-bee as she is just 4 months
old since born, she could/did not make the hole. I find a piece of glass
in the side of the tank and it was like a tiny/weeney perfect pyramid.
Could not make one better if I tried.
I need big caliber shot of the Welsh Whiskey!!
<Ahh!>
I know what you say about glass is liquid. I learn many years ago (was
Photographer) that in churches, old churches best, the stained glass
windows were always more thick at the bottom of each panel, seriously
Bob, (maybe I teach you something huh?...I should be so lucky!).
<Have experienced this as well>
I might give up on this big tank think I, and go back with my little
400g tank.
What you think my friend?
<As above>
Many, many thanks,
Ayrton.
PS. Just a quickie Bob. I want to have a Mantis shrimp in a bee bee tank
say 3 gallons. Would you use glass or plastic for the tank?
<Plastic>
Tanks again.
<And you, BobF>
|
|
Chipped tank 1/4/13
Hello
<Paul>
I recently purchased a new 15g tank and set it up as a
saltwater aquarium.
It has been running fine for a couple of weeks now. However, this
morning I noticed a small chip on the front glass of the tank which I
have not noticed before. I must have knocked something against it but
don't recall this happening. The flake/chip is very shallow, so I assume
it will not affect the structural viability of the tank, but doesn't
look great. Is it something I can ignore?
<Very likely so; yes (due to the size of system, position, entirety of
the chip)... I might "fill it in" with a bit of Silicone/Silastic to
prevent cutting your hands/fingers, but structurally this is almost
assuredly fine>
Should I turn the tank around of leave it?
<You could turn it about if convenient, but I would still fill in the
spot>
Pictures attached:
Front view:
side view:
Thank you in advance
regards
Paul
<Welcome. Bob Fenner>
Paul Atkinson
|


Re: Chipped tank 1/4/13
Thanks you very much, Bob, for your quick and reassuring reply.
regards
Paul
<Welcome Paul. BobF>
|
|
I think my tank is a goner 12/15/12
Hi crew,
<Duncan>
After planning a move carefully using WWM FAQs, involving both a 180 and
a 70-litre tank, I fell at the last hurdle and banged the corner of the
70-litre against the handrail of my new place as I was moving in.
<Yikes!>
After perusing the FAQs, I think this tank is now a goner, given the
chip is in the bottom corner and that it seems to run through the whole
width of
the pane :-(.
<Unfortunate>
Could you please confirm this based on the four pictures supplied?
<I wouldn't call it a total loss until you leak test it. Take it
someplace safe, like outside. Fill the bottom 1/4 with water and
let it stand for 24
hours. Add another 1/4 and let it stand another 24 hours. Repeat
until the tank is completely full and has not leaked for 24 hours, you
then need to
decide how much confidence you have in the tank. If you do decide
to use it, I would still locate the tank someplace where a leak would
not be a
complete catastrophe. If the tank does leak during your test, it
would best be used as a reptile or rodent tank.>
Cheers and thanks,
Duncan.
<Good luck - Rick.>
|
.jpg)
.jpg)
.jpg)
.jpg) |
|
chips on Hexagon corners 10/15/12
My CraigsList purchase turned bad - Chipped corners Hexagon tank 45 gal -
Very worried about Hexagon corner, since they meet at sharp corner point
with silicone on each side of the seams, where the outer vertical seams are
basically a triangle gap filled with silicone (is this a usual construction
of all glass hexagon tanks?).
<With Craigslist, caveat emptor. Yes, this is typical hex tank
construction.>
Wow your site is awesome, I am so glad to have discovered it while
researching "can I repair chip".
<It's an excellent resource and growing all the time.>
I love my fish (for 5 years tending 50 gal fresh water with 8 beautiful,
large, colorful Cichlids, school of Foil
Barbs, and a pair of Convicts who always get picked on which is another
reason I'm starting this second tank. A few times a year I redecorate and
rearrange with unique broken marble granite pieces which makes wonderful
caves where i arrange a visual view of each fishes chosen home. It is so fun
to watch them discover which cave they will choose this time, and they are
quite playful while I am arranging, lol.
<Be sure this doesn't impact the fish. There are some fishes where
rearranging will break pair bonds--the genus Julidochromis, for instance.>
Well..... I wanted to add this 45 gal hexagon as second tank. I purchased it
as, tank only, no stand or top, from a craigslist ad, and got it home and
discovered what I believe to be bad chips on 2 of the vertical seams.
<Inspect before buying. Caveat emptor.>
Sadly, circumstances lead me to believe she knew of the chips when she sold
it to me.
<Probably. Hopefully factored into the price.>
They look bad here at home so I didn't even attempt water yet. I picked out
the old silicone to get a better view (which I hope pictures show. I have
read through many of your excellent posts which helped me decide to repair,
but I didn't see
hexagon, and my corners seem different.
<Picking out the silicone may or may not have been a good idea. The tank
might have been fine as-was. I would have leak tested first. From the photos
it is not really clear if the chips are on the inside or outside of the
tank. Outside is far more likely and also structurally a much better place
to have damage like this.>
Are they weaker where they meet at the sharpness of the corner, since don't
overlap as the standard does?
<The tank is more dependent upon the silicone than square corners, but the
base and top should have a plastic rim to help with structural integrity. I
wouldn't mess with them.>
I want to be sure I am deciding to repair this correctly or is there a
better option. First, do I have to entirely replace the piece with the big
chip where the glass meets at that sharp corner and has a chip in the gap
where they should touch? i can get new glass if necessary.
Replacing an entire pane or rebuilding a whole tank is a very big job.
Better to leave it assembled and repair only what is necessary to repair.
You've removed one section of silicone so that area is mandatory to repair.>
Second, can I seal only the length of the damaged vertical seams, or must i
remove all silicone and reseal whole tank because of the old silicone may
not bonding well to remaining top and bottom seals?
<I would start by resealing what you removed.>
Do I also need to remove top and bottom silicone seals and the remaining
panel seams?
<Not recommended unless you want to rebuild the entire tank. Many places to
go wrong.>
I will thoroughly clean seams/glass to be sure no residue to ensure good
seal.
<Good idea. If the chips are on the outside surface, they shouldn't be a big
deal. If they are on the inside, leaving a hole where the two glass panes
come together, that is bad news and probably needs a new pane. As I said
above, I would reseal the are where you removed silicone, wait a week, then
do a leak test on the tank *outside* in case of catastrophic failure.
If it's already too cold to do that, I'd wait for spring. When you leak
test, especially on a big tank, you want the chance to detect slow leaks, so
the testing is not done quickly. Fill the bottom 1/4 of the tank and dry the
outside surfaces. Wait 24 hours and look for moisture outside. If all looks
good, add another 1/4 so the tank is half full and wait another 24
hours, checking for moisture again. Repeat two more times until the tank has
been totally full for 24 hours. If there is a slow leak at the bottom, the
weight of the water above it should help you detect it. If the seals are bad
and the tank catastrophically fails, better to have 45 gallons of water
outside.>
I believe I changed pics to below 100 kb each, I hope the quality an still
show the damage.
I sincerely Thank You for your reply ~ * lovinfish *
<Welcome. Rick>
|
.jpeg)
.jpeg)
 |
|
|

